Pen Tool in CorelDraw: Everything to Master Pen Tool
With the Pen Tool’s significance in both vector and raster applications like Photoshop and Gimp, as well as its role in creating vector graphics using software such as CorelDraw, Adobe Illustrator, Inkscape, and Affinity Designer, I recognized the need to guide in effectively utilizing this fundamental tool.
I aim to provide you with the most straightforward approach to learning the pen tool. Enjoy your lessons.
Let’s begin!
The Basic Functions of the Pen Tool in CorelDraw
Do you prefer video content? Please watch the video below to see the practical use of the pen tool for beginners.
The Pen Tool is fundamental for crafting vector graphics, enabling designers to craft shapes with fluid, freeform curves. The Pen Tool is considered one of the most dynamic drawing tools in the CorelDraw Toolbox.
Before creating our first shape, let’s look at some of the pen tool’s basic functions.
What is the Pen Tool in CorelDraw?
The primary function of the Pen Tool is to draw paths. Paths are lines or shapes that can be manipulated, filled with color, used for selections, or converted into selections for various purposes within graphic design software.
The Pen Tool allows users to create precise paths and shapes by defining nodes or anchor points and manipulating bezier curves.
Using the Pen Tool
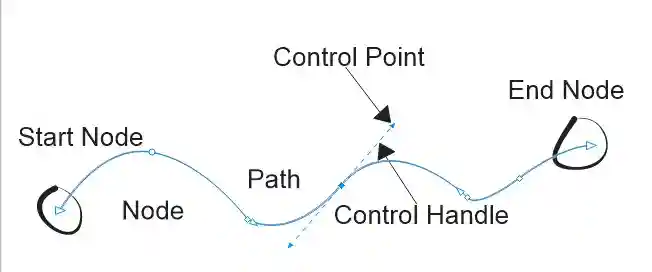
When using the Pen Tool, select it from the “Toolbox,” click to create the start node, and click again to draw the end node. To draw a curve, click and drag the “Pen Tool” holding down the mouse button to activate the bezier mode to make curved paths.
The “Control handles” and “Control points” extending from the nodes allow users to control the direction and curvature of the path segments by adjusting their length and angle.
7 Importance and Use of the Pen Tool
The Pen Tool holds significant importance in graphic design software due to its versatility and wide range of applications.
If you’re new to graphic design, you may not yet have grasped the importance and use of the pen tool, despite having encountered numerous examples of its usage.
Here are some key points highlighting its importance and applications.
1. Drawing Paths
The Pen Tool allows designers to create precise and intricate shapes with smooth curves and clean lines. This precision is crucial for tasks like logo design, illustration, and digital art.
See how the pen tool is used in this Illustrator tutorial. Don’t forget that there may be some disparities in using the pen tool in CorelDraw.
2. Path Editing
Beyond just creating paths, the Pen Tool allows easy editing and manipulation of paths and nodes. Designers can refine and adjust paths until they achieve the desired result, giving them full control over the design process.
To know more about editing the paths you create in CorelDraw, read this article on the edit shape tools in CorelDraw.
3. Illustration and Design
Many digital artists rely on the Pen Tool for creating detailed illustrations and artwork. Its ability to create smooth, flowing lines makes it well-suited for sketching, outlining, and shading.
Logos often require clean, scalable graphics, making the Pen Tool indispensable for logo designers.
It allows them to create custom shapes and typography with precision, ensuring that logos look professional and consistent across different platforms and sizes.
Daniel White did a good job at TutsPlus using the pen tool in Adobe Illustrator to create a clean simple logo in this tutorial.
4. Masking and Clipping Paths
The Pen Tool is also used for creating masking and clipping paths, which are essential for isolating and manipulating specific parts of an image or graphic.
See the example of masking and clipping paths in this article: 5 ways to remove background in CorelDraw.
5. Typography and Lettering
When it comes to crafting custom typography and lettering designs, the Pen Tool offers unparalleled flexibility and control.
By drawing precise paths for each letterform, designers can create unique typographic compositions with perfect curves and angles.
6. Vector Art and Animation
In vector-based animation and motion graphics, the Pen Tool serves as a fundamental tool for creating dynamic shapes and motion paths.
Combining bezier curves with keyframe animation, artists can bring their creations to life with fluid movement and seamless transitions.
See how to use the pen tool in After Effects to create animation.
7. Photo Editing and Retouching
In photo editing software like Adobe Photoshop, the Pen Tool plays a crucial role in precise selections and masking.
By creating custom paths around subjects or objects, photographers can isolate specific elements within an image for targeted editing or compositing.
CreativeSalek whose channel has 70.4K subscribers got folks clapping hands in this YouTube tutorial where he taught How to Remove Background in Photoshop CC – Using Pen Tool.
Pen Tool Terms and Techniques
The Pen Tool operates through a series of clicks and adjustments, allowing users to define anchor points and manipulate bezier curves to create custom shapes and paths.
Here are terms and techniques you should familiarize yourself with.
1. Nodes/Anchor Points
These are points that define the start and end of a path segment. Clicking with the Pen Tool creates nodes or anchor points, and each subsequent click adds a new anchor point connected by a straight line or bezier curve.
2. Bezier Curves
By clicking and dragging on an anchor point, you can control the direction and curvature of the path segments, allowing for smooth and precise curves.
3. Handles
Handles extending from anchor points dictate the direction and length of the bezier curves. Adjusting these handles enables fine-tuning of the path’s shape and curvature.
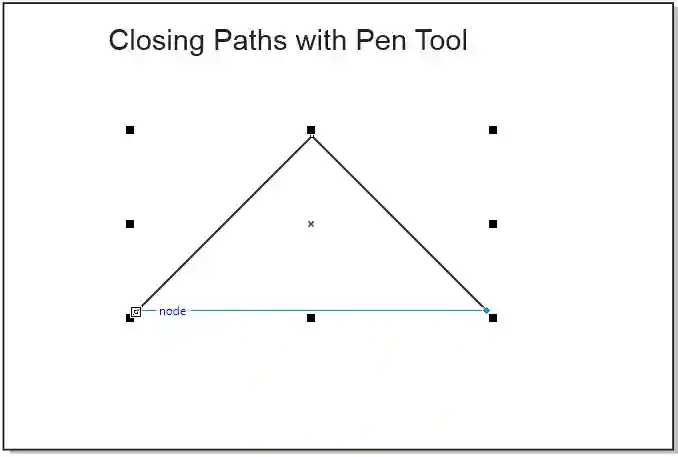
4. Closing Paths
To close a path, simply click on the initial anchor point. This creates a closed shape, which can be filled with color or used as a selection for further manipulation.
At the end of this tutorial you will learn how to draw basic shapes with the pen tool, so keep reading.
What are Nodes?
Nodes are points on a path that defines their shape. These points are where the path begins, ends, or changes direction in graphic design and vector drawing software like CorelDraw, Adobe Illustrator, or Inkscape.
They play a crucial role in creating and editing vector graphics, allowing designers to create precise and complex shapes.
Difference Between Nodes and Anchor Points
In CorelDRAW, a node denotes the starting point, ending point, or any location where a path alters its direction. Conversely, Adobe Illustrator uses the term “anchor point” to describe these positions, which include the start, end, or points of directional change along a path.
Anchor points or nodes are connected by line segments or curves, and they can be manipulated to adjust the shape of the path.
Read this help document which compares CorelDraw and Illustrator tools on the Corel official page to see how Corel and Adobe refer to the term.
The terms “anchor point” and “node” are often used interchangeably in vector graphics software documentation and discussions.
How to Use Pen Tool in CorelDRAW for Beginners
As promised, we are finally here to draw some basic shapes in CorelDraw using the pen tool. If you use Illustrator, the skills acquired in this tutorial will help you as well.
Getting Started:
1. Select the Pen Tool
Install and launch CorelDraw if you don’t have CorelDraw already. You can download CorelDraw from the official website and try CorelDraw for free.
After launching your software, create your document where you can draw all your art by clicking “New Document.”
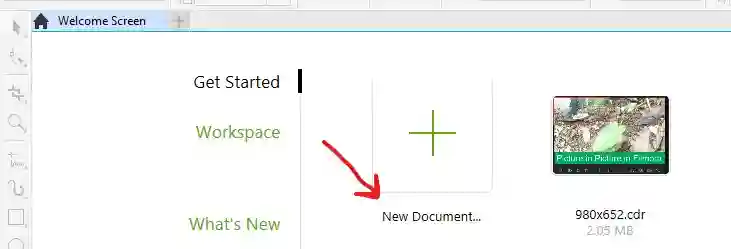
You can leave the default settings, for this tutorial, we will be defining custom units.
Set the document “Units” to ‘Pixels’ and specify the page dimensions with a width of “768” and a height of “512.” See the image below.

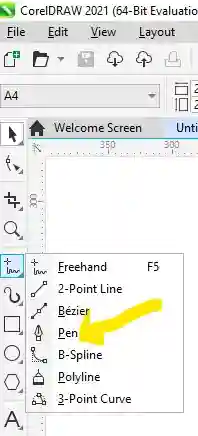
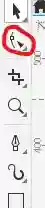
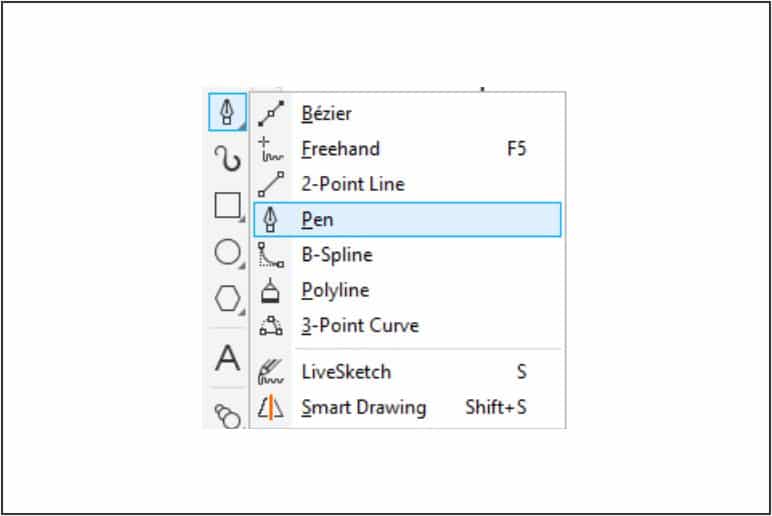
Locate the “Pen Tool” in the “Toolbox” on the left side of the screen. It’s typically represented by an icon resembling a fountain pen. To select the pen tool, click on the “Freehand Tool” drop-down menu.
From the flyout, select the pen tool.
2. Creating Nodes
Drawing with the pen tool in CorelDraw starts with creating a node. So let’s learn how to create our first node and build on it.
To start drawing with the “Pen Tool,” simply click on the “Drawing Page” to create nodes. Each click will generate a new node, and a line will connect each point as you continue clicking.
Click and move the mouse pointer to the next location and click again. To end your drawing double-click or select the “Pick Tool.”

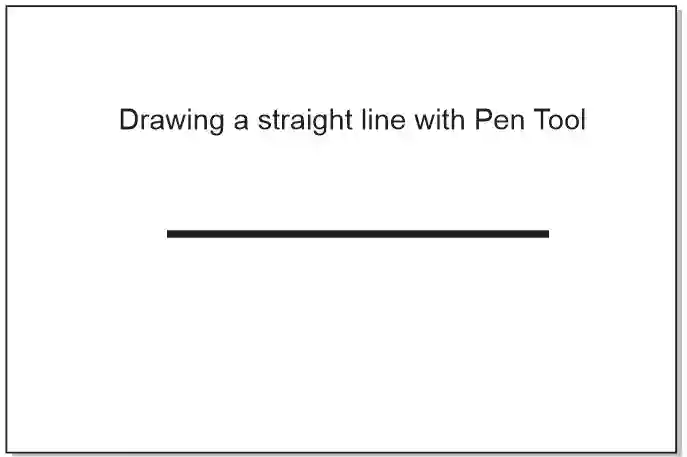
3. Drawing Straight Lines
By clicking multiple times, you can create a series of straight-line segments. Each click will add a new node, and CorelDraw will automatically connect them with straight lines.
Click and move the mouse pointer to the right and click again.
More on how to draw a contained and freehand line in the next topic.
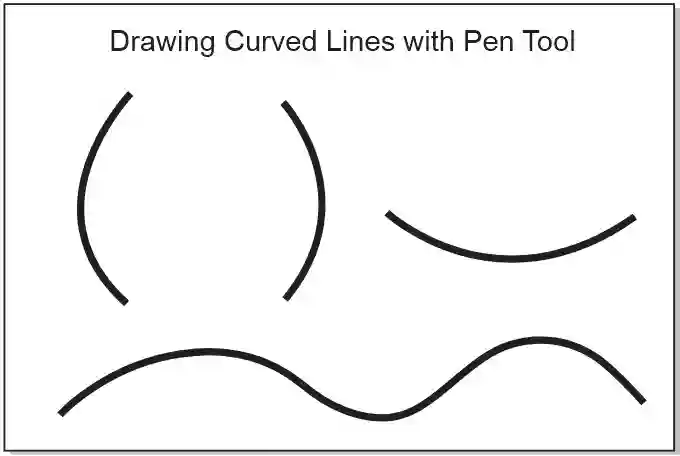
4. Drawing Curved Lines
To create curved lines, click and drag while holding down the mouse button. This action will create handles that control the curvature of the line segment.
Experiment with dragging the handles to adjust the curve to your liking.
Click to create the first node, then, hold down the mouse button and drag the mouse. You will notice a curve while you drag, when satisfied with the curve click again to create the second node.
Keep repeating the same process until you are ok with the curve and then press the “Escape” button on the keyboard to end the drawing.
More on how to draw a curve in the next topic.
5. Closing Paths
To close a path and create a shape, simply click on the first node you created. This will complete the path and form a closed shape.
Let’s practice with a triangle.
Click to create your node. Move the mouse upward and create the second node. Next, move the mouse downward to create the third node.
Now let’s close our triangle by moving the mouse pointer to the first node to click inside the square that automatically appears to close our triangle.
Note: Clicking outside the square will not connect the last node to the first point. CorelDraw provides the square as a guide to click the first node to join your paths.
Learning Pen Tool Advanced Techniques
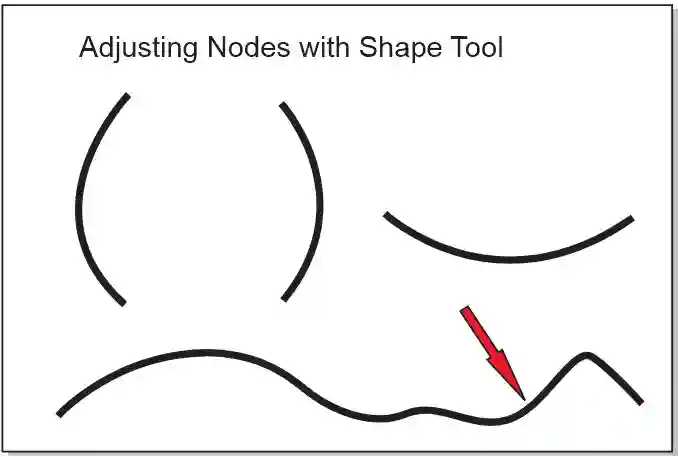
6. Adjusting Nodes
After creating a path, you can fine-tune its shape by adjusting the position of individual nodes.
Select the “Shape Tool” (F10) from the “Toolbox,” click on a node to select it, and then drag it to a new position.
Let’s practice this by using the 3rd curve in our fourth node. See the image below.
Open the fourth exercise and select the “Shape Tool” in the toolbox or press F10 on the keyboard.
2. Select the curve object and you will see all the nodes that we created in the previous lesson.

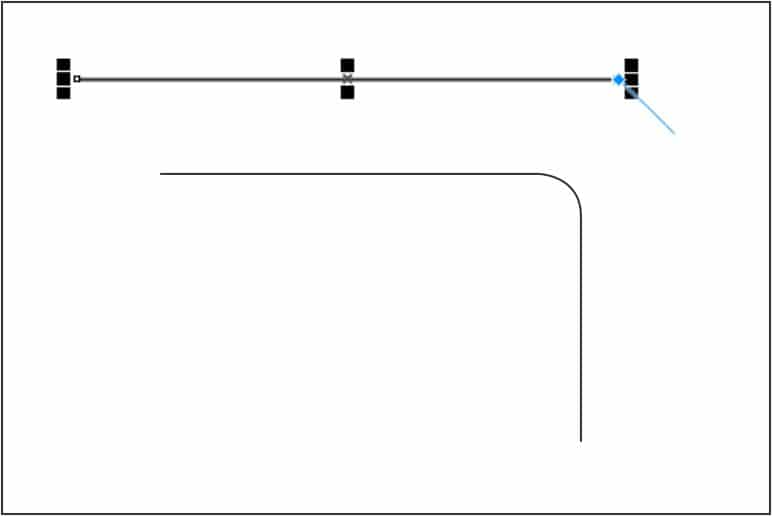
You can adjust each of the points by moving them to a different location. Counting from the right, let’s change the position of the fifth node downwards.
Click the node while holding down the mouse button, and drag the point as shown in the picture below.
7. Converting Nodes
CorelDRAW offers different types of nodes, including smooth, symmetrical, and cusp points. Experiment with these variations to achieve different shapes and curves.
8. Adding and Removing Nodes
Use the Pen Tool to add new nodes to an existing path by clicking on the path where you want to add a point. Conversely, you can remove nodes by selecting them with the “Shape tool” and pressing the “Delete” key.
Drawing Straight Line with Pen Tool
First launch your vector graphic software, CorelDraw or Illustrator, and select the “Pen tool.” In CorelDraw, you will find the pen tool in the “Toolbox.”
Click an empty or blank part of the drawing page to create your first node or start node.
Move the mouse pointer to the next location and click. Press the escape key or spacebar to complete the line.
Looking at your line, you will notice the line is jerky. That is fine. Let’s learn how to draw a constrained line this time.

To draw a straight line without it looking bumpy:
Select the “Pen tool” in the “Toolbox” or press the “Spacebar” to activate the Pen tool.
Click an empty or blank part of the worksheet
After you have created your start node, hold the “Shift” key down on the keyboard.
With the Shift key down, move the mouse pointer to the right or next location and click to create the end node.
This time, you will notice the line is straight. That is how you draw a constrained line using the Pen tool.

Wait before I forget, you can also create a straight line without holding down the Shift key. But this is not quite easy to get.
Let’s look at this method.
Click to draw the start node, move the mouse pointer to the next area, and adjust the pen tool. Follow the pen tool preview closely, once the preview is straight click again to draw the end node.
If you get it congratulations! Let me know in the comments.
How to Create an Enclosed Shape with Pen Tool
We learned how to draw a straight line with the pen tool but that is not enough to make you create better shapes. It is just the start.
Now let’s take a step further to create an enclosed shape.
Select the Pen tool.
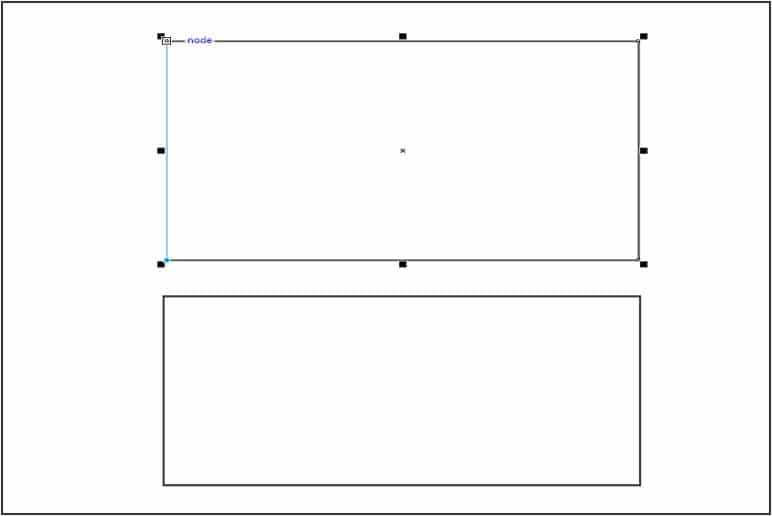
Click an empty or blank part of the worksheet. We are starting from the top right corner. You can start anywhere.
Hold the Shift key down on the keyboard, move the pen tool to the right, and click to draw the second node.
Note that we are holding the shift key down to draw a constrained line.
The shape we are drawing is a rectangle. Follow the picture above to arrive at the same result. After creating all the angles of the shape, we will have to click on the start node to close our shape.
Move the pen tool downwards to draw the next line. Click again to draw the bottom line.
Move the mouse pointer to the start node (the part of the shape you created first) and click on it to connect the shape.
That’s it. You’ve drawn a perfect rectangle.
Drawing Curves with Pen Tool
Select the Pen tool.
Click an empty or blank part of the worksheet.
With a finger on the Shift key, move the mouse pointer to the right and lick to make a point.
Now, slant the mouse pointer downwards, long-click the left mouse button, and drag the mouse to create a curve.
Release the mouse button after getting the right shape.
Move the mouse downwards and click once to draw a straight line.
Slant the mouse pointer downwards but now to the left.
Long press the mouse button and drag the mouse to create another curve. Release the mouse button.
Move the pointer to the left to draw a straight line.
Slant the pointer a little upward and create a curve.
Draw another line, but now, upward.
Slant the pointer towards the right.
Click inside the top left connector and drag the mouse to create another curve.
Use the handle to adjust the curve.
Looking carefully, you will notice one of my curves is not perfect.
You can keep trying until you get the right connections or use the Shape tool to finetune the edges.
If you prefer a video please watch the video below.
What’s Next?
The best way to explain Pen Tool is through demonstration.
In the upcoming lessons, we will demonstrate the use of the Pen Tool through various designs, ensuring that the concepts remain easy to understand.
Course Materials
To follow along you need these course materials.
- Windows 7 and above
- CorelDraw X5 and above
- Do not skip any of the exercises
- Leave questions in the comment box or our Beginners Dateguide Community if you have a challenge.
This entrance is phenomenal. The splendid substance displays the maker’s dedication. I’m overwhelmed and anticipate more such astonishing sections.
Thank you.
This website page is unbelievable. The brilliant substance reveals the essayist’s interest. I’m awestruck and anticipate further such mind blowing entries.
This stage is fabulous. The magnificent information uncovers the essayist’s excitement. I’m shocked and anticipate additional such mind blowing material.
This page is fabulous. The brilliant information reveals the essayist’s interest. I’m awestruck and envision further such mind blowing material.
I’ve read several just right stuff here. Certainly price bookmarking for revisiting. I wonder how a lot effort you place to create this kind of great informative website.
Nice to know.
Wonderful beat ! I wish to apprentice while you amend your web site, how could i subscribe for a blog web site? The account aided me a acceptable deal. I had been a little bit acquainted of this your broadcast provided bright clear idea
Hi, Neat post. There’s an issue together with your web site in internet explorer, may test this·IE still is the marketplace chief and a good component of people will pass over your fantastic writing due to this problem.
Thank you for the auspicious writeup. It in fact was a amusement account it. Look advanced to more added agreeable from you! By the way, how could we communicate?
Although I believe every thought you have for your post is excellent and will undoubtedly be successful, the postings are too brief for new readers. Maybe you could extend them a little bit the next time? I’m grateful for the post.
Will work on it.
I’m impressed by the quality of this content! The author has undoubtedly put a great amount of effort into investigating and structuring the information. It’s inspiring to come across an article that not only provides useful information but also keeps the readers captivated from start to finish. Kudos to her for making such a masterpiece!
Hi there! I know this is kinda off topic but I’d figured I’d ask. Would you be interested in exchanging links or maybe guest authoring a blog post or vice-versa? My site goes over a lot of the same topics as yours and I feel we could greatly benefit from each other. If you might be interested feel free to shoot me an e-mail. I look forward to hearing from you! Superb blog by the way!
Reach me through the contact page lets talk about it.
Good ? I should definitely pronounce, impressed with your web site. I had no trouble navigating through all the tabs and related info ended up being truly simple to do to access. I recently found what I hoped for before you know it in the least. Reasonably unusual. Is likely to appreciate it for those who add forums or anything, website theme . a tones way for your customer to communicate. Excellent task.
You could definitely see your enthusiasm within the paintings you write. The sector hopes for more passionate writers such as you who are not afraid to mention how they believe. At all times go after your heart.
I have not checked in here for some time since I thought it was getting boring, but the last few posts are great quality so I guess I will add you back to my daily bloglist. You deserve it my friend 🙂
We stumbled over here by a different web address and thought I may as well check things out. I like what I see so now i am following you. Look forward to looking into your web page repeatedly.
I can’t express how much I admire the effort the author has put into creating this outstanding piece of content. The clarity of the writing, the depth of analysis, and the plethora of information offered are simply astonishing. His passion for the subject is obvious, and it has definitely resonated with me. Thank you, author, for offering your insights and enlightening our lives with this incredible article!
Thanks for the strategies presented. One thing I additionally believe is the fact that credit cards presenting a 0 interest rate often attract consumers together with zero rate, instant acceptance and easy over-the-internet balance transfers, nevertheless beware of the main factor that will certainly void your own 0 easy road annual percentage rate plus throw anybody out into the terrible house rapidly.
Thanks for the article. I have continually noticed that most people are needing to lose weight because they wish to look slim and also attractive. However, they do not often realize that there are many benefits just for losing weight also. Doctors say that overweight people are afflicted with a variety of disorders that can be directly attributed to their excess weight. The great news is that people who definitely are overweight in addition to suffering from different diseases can help to eliminate the severity of their particular illnesses by losing weight. It is possible to see a continuous but marked improvement in health as soon as even a slight amount of fat loss is obtained.
great submit, very informative. I wonder why the other specialists of this sector do not understand this. You must proceed your writing. I’m confident, you’ve a great readers’ base already!
What an eye-opening and well-researched article! The author’s meticulousness and aptitude to present complicated ideas in a comprehensible manner is truly praiseworthy. I’m extremely impressed by the scope of knowledge showcased in this piece. Thank you, author, for offering your knowledge with us. This article has been a true revelation!
Thanks!
Almost all of what you mention happens to be supprisingly precise and it makes me ponder why I had not looked at this in this light before. Your article truly did switch the light on for me as far as this subject matter goes. Nevertheless there is one factor I am not necessarily too cozy with and while I make an effort to reconcile that with the actual central idea of your issue, allow me observe exactly what all the rest of the visitors have to point out.Well done.
One thing is that when you’re searching for a education loan you may find that you will need a co-signer. There are many conditions where this is correct because you might find that you do not possess a past history of credit so the bank will require that you’ve someone cosign the financing for you. Good post.
Hello! I know this is kinda off topic however I’d figured I’d ask. Would you be interested in trading links or maybe guest writing a blog post or vice-versa? My blog goes over a lot of the same subjects as yours and I feel we could greatly benefit from each other. If you’re interested feel free to shoot me an email. I look forward to hearing from you! Fantastic blog by the way!
I’ve been absent for some time, but now I remember why I used to love this site. Thanks , I will try and check back more frequently. How frequently you update your site?
I feel this is among the so much vital info for me. And i am happy reading your article. However should commentary on some normal things, The website taste is wonderful, the articles is actually nice : D. Just right job, cheers
Hi there! I could have sworn I’ve been to this blog before but after checking through some of the post I realized it’s new to me. Nonetheless, I’m definitely happy I found it and I’ll be book-marking and checking back often!
Audio began playing anytime I opened this internet site, so irritating!
Sorry we got some auto play videos but the audio is always mute. Sorry for any inconvenience.
Excellent site you have here but I was wondering if you knew of any message boards that cover the same topics discussed in this article? I’d really love to be a part of community where I can get comments from other knowledgeable people that share the same interest. If you have any recommendations, please let me know. Bless you!
Hi there, I discovered your site by the use of Google at the same time as searching for a similar topic, your site came up, it seems to be good. I’ve bookmarked it in my google bookmarks.
https://gentechscientific.com/
I’m so happy to read this. This is the type of manual that needs to be given and not the random misinformation that is at the other blogs. Appreciate your sharing this best doc.
Youre so cool! I dont suppose Ive learn something like this before. So good to find someone with some original thoughts on this subject. realy thanks for starting this up. this web site is one thing that’s needed on the net, someone with slightly originality. helpful job for bringing something new to the web!
https://get-neotonics.com/
I just couldn’t depart your website prior to suggesting that I really enjoyed the standard information a person provide for your visitors? Is going to be back often in order to check up on new posts
https://alldayslimmingtea-tea.com/